

Self-serve migration guide for Recharge
Migrating from Recharge with a Stripe integration over to Ordergroove can be done using Ordergroove's migration tool. There are many benefits of migrating over to Ordergroove so we are excited to have you onboard. We'll walk you through how to migrate over from Recharge.
TimeframesThe timeframes provided are a general estimate, and should not be taken at face value. There are a number of factors that could affect your program launch such as project resources, custom add-ons, and the scope of the project.
This guide is meant to help you get through migration in the "happy path scenario" where everything is working as it should. When things are configured correctly, the process can take a few hours with more than 70% of your data importing successfully. In the event you experience errors or some data not successfully migrating, don't worry, we are here to help. For any questions regarding errors, data issues, or anything else, open a ticket and someone from the Ordergroove migrations team will help you.
Migration Overview
The migration process is broken up into three high-level steps:
- Preparation - you'll be getting your migration ready. This typically takes less than an hour
- Test migration - you'll be doing a test migration to ensure your preparations were set up correctly. The time it takes depends on how much data you have
- Final migration - you'll be officially moving over all of your Recharge active subscriber data over. The time it takes depends on how much data you are migrating
This guide is meant to help you get through migration in the "happy path scenario" where everything is working as it should. When things are configured correctly, the process can take a few hours with more than 70% of your data importing successfully. In the event you experience errors or some data not successfully migrating, don't worry, we are here to help. For any questions regarding errors, data issues, or anything else, open a ticket and someone from the Ordergroove migrations team will help you.
WarningDo NOT uninstall Recharge from your Shopify store until the migration is successful and it is working as you would like.
Preparations
To get your migration started, you'll need to complete a few steps to prepare for it. You'll need to:
- Create a Recharge API token
- Create a test customer/subscription to migrate
- Confirm your Shopify Checkout requirements
1. Create a Recharge API token
Takes about 5 minutes to complete
A Recharge API token is what allows Ordergroove to extract data from Recharge. To create one, follow the following steps:
- Open the Recharge app inside Shopify
- On the left side nav bar, click Apps and then click API Tokens
- Click Create an API token button on the top right
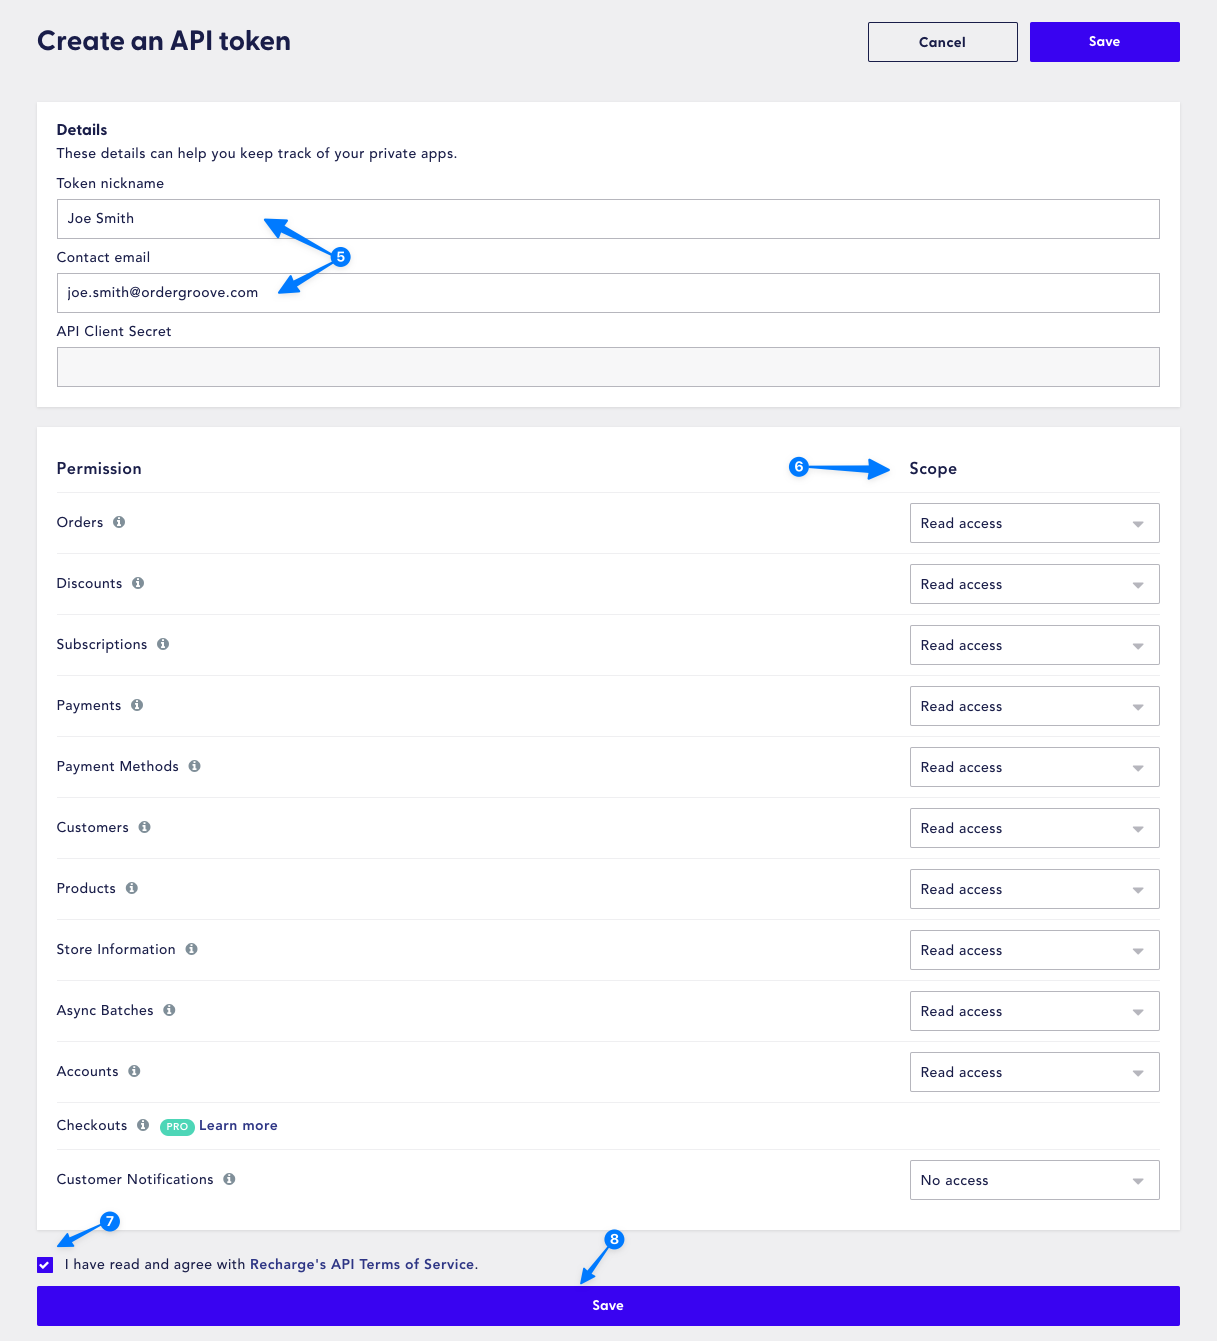
- Fill out the form
- Token nickname will be your name
- Contact email will be your email address
- API Client Secret will be left blank
- Change the Scope settings to Read access for each permission. This allows Ordergroove to read the data to be migrated
- You can leave Custom Notifications permission as No access
- Check the Terms of Service consent
- Click Save
- Your Recharge API key is created and you're all set.
2. Create a test customer/subscription
Takes about 5 to 10 minutes to complete
A test customer/subscription is a subscription in your subscription program associated with you or one of your employees. Create a customer in Recharge using your (or another employee's) information.
This creates a litmus test of the migration from beginning to end:
- Extract data from Recharge
- Import the test customer/subscription into Ordergroove
- Place an order through Ordergroove into your Ecomm system
- Confirm payment processed correctly
If you'd like to create more than one to test, feel free to do so. Make sure to keep the email address for each handy as you will need to reference them later.
3. Confirm your Shopify checkout configurations
Takes about 5 minutes to complete
The last step is to ensure the Shopify checkout settings are configured correctly.
Ensure yoursubscription field requirements are set in Ordergroove to match the data you're importing.
- Navigate to your Shopify store and click on Settings located on the bottom left of the navigation
- Click Checkout on the left navigation
- Under the Customer information section
- If Shipping address phone number, Address line 2, or Company name field are set as Required, open a ticket requesting Ordergroove to enable the specific fields in Ordergroove.
- If Shipping address phone number, Address line 2, or Company name field are set as Don't include or Optional, you're all set.
Test Migration
Now that the preparations are complete, you will want to do a test run of the migration. The time this takes depends on the size of data you are migrating over. A more established subscription program means more data therefore means longer migration times. This can range from a few minutes to several hours. But, keep in mind, this is a one time thing you will have to do.
A test migration requires the following:
- Downloading the migration tool
- Transforming the Recharge data for use in Ordergroove
- Testing the data integrity
- Resolve errors
By doing a test migration, you will also get familiar with the migration tool and how it works so when the time comes for the final migration, you will fly through it.
1. Downloading the migration tool
Takes about 3-5 minutes to complete
The migration tool will allow Ordergroove to download from Recharge and transform it so I can be used within Ordergroove.
Here's how to download the migration tool:
- Log into Ordergroove
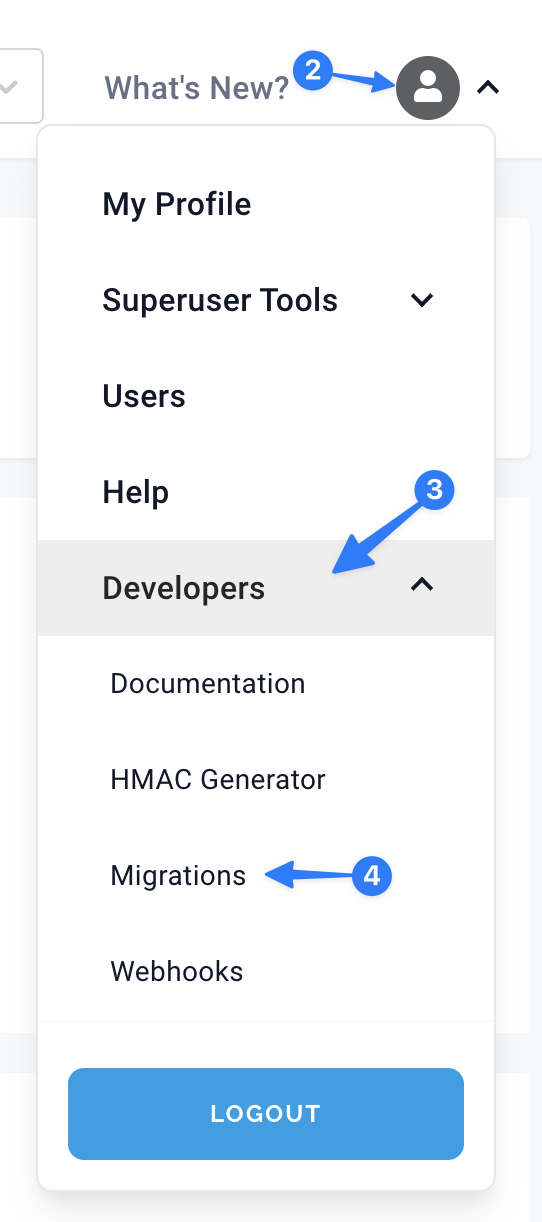
- Click the Profile button in the navigation
- Click Developers
- Click Migrations or go directly to the Migrations page here
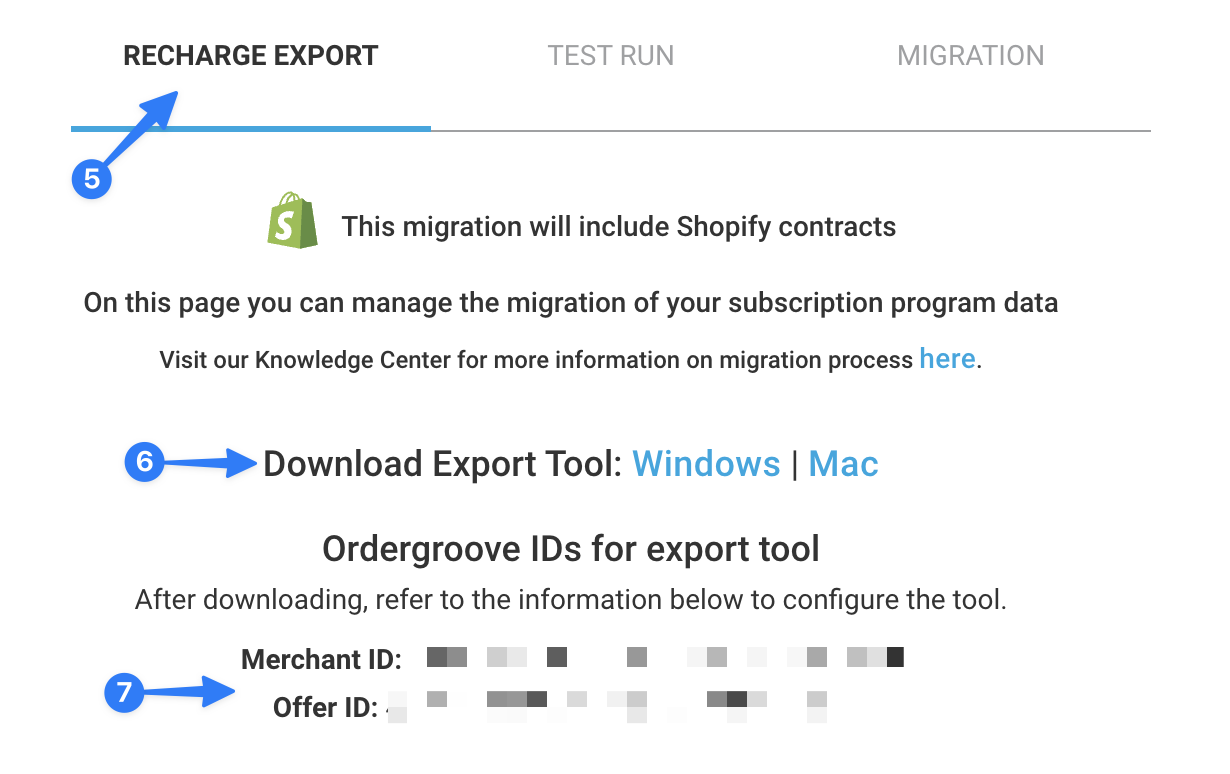
- On the Migrations page, click RECHARGE EXPORT
- In the Download Export Tool section, select Windows or Mac
- Keep the migrations page open while the tool downloads as you will need the Merchant ID and Offer ID to configure the migration tool
2. Transforming the Recharge data for use in Ordergroove
Takes 10 minutes to an 1 hour to complete, depending on data size
It's time to download the data from Recharge and transform it for use in Ordergroove.
Note: For this step, you will need the Recharge API key you created during preparation.
Open the tool you just downloaded, and go through the following steps:
- Read through the EULA
- Choose a directory to download the data and Click Next
- Paste the Merchant ID from the Migrations page here
- Paste the Offer ID from the Migrations page here
- Paste the Recharge API token
- You can skip the "Braintree credentials" view
That's it. The data will start downloading from Recharge and we'll transform into a format our system can understand. Upon completion, in the download directory, you'll have six (6) files available to you.
- Four (4) files containing the raw customer, address, subscription, and payment data extracted from Recharge. Their filename formats are as follows:
rc-<timestamp>-customersrc-<timestamp>-addressesrc-<timestamp>-subscriptions
- One summary file containing a count of payment processors:
rc-<timestamp>-transformed-data-for-migration-to-ordergroove.json.summary- Note: If you see any payment processor BESIDES "stripe" - please stop and open a ticket with us immediately.
- One file containing the transformed data:
rc-<timestamp>-transformed-data-for-migration-to-ordergroove.json- This is the file we'll be using for the next step.
If there are any errors, you'll want to start from scratch. If you run into any issues here do not hesitate to reach out to us.
3. Testing the data integrity
Takes 10 minutes to an 1 hour to complete, depending on data size
Now that we've downloaded and transformed the data, it's time to test the data integrity.
- Go back to the Migrations page in Ordergroove.
- Make sure you're on the "Test Run" tab
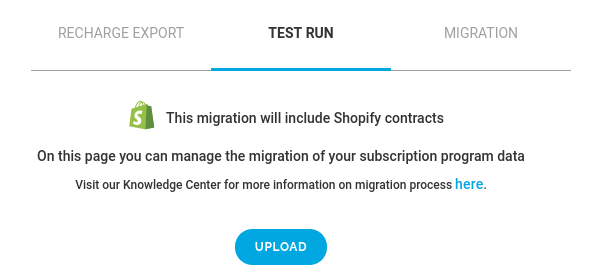
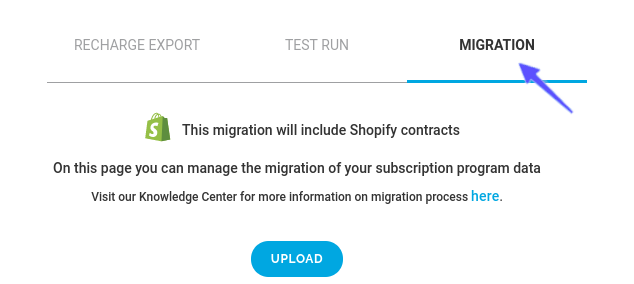
NoteIf you do not see the Shopify logo and the message "This migration will include Shopify contracts" the payment processing test will fail later. Please open a ticket with us before moving forward.
- Click on the Upload button and select the "transform" file from the previous step.
A new row will appear in the table below indicating that the Test Run process has begun

Periodically check back on this page. We're waiting for the Processing Status column to move from "In Progress…" to "Completed" at which point you can download Unprocessed, Errors, and Successful files.
If you run into any issues here, please open a ticket with us.
4. Resolve Errors
Takes 10 minutes to more than 1 hour to complete, depending on data size
You'll know the data integrity checks have completed when the row containing "Processing Status" column shows Completed for the file you uploaded

If instead you see the status as Cancelled, you'll want to retry uploading and testing your file.

You'll notice that we have three columns:
- Successful - a file consisting of all the customers and their respective subscription information that passed initial validations. This file would represent something you could attempt to import in the "Migration" tab - but we're not ready for that yet
- Errors - this file is similar in structure to the "Successful" file except we found some data integrity issues that you'll need to resolve.
- Unprocessed - this file is more for debugging purposes. This represents data that we simply could not put together or understand. Some examples: there are subscriptions referencing a customer that does not exist in the migration file, invalid JSON, etc.
Error remediation can be by and large the most time consuming (and frustrating) part of a migration process. This is why we're in a preparatory phase - if you get ahead of it now, you won't feel bad taking a break and coming back to it later.
Here are some resources that we think should be helpful to get you going
- You can get a better understanding of the types of errors you might encounter in the error file in the Errors section in the Knowledge Center.
- If you're feeling more adventurous, we have a script/utility you can use to parse the error file and provide more of a summarized view of the file. It takes the file and focuses on the errors, showing the errors that manifested for each specific customer.
At the end of the day, you'll have to look in that file to determine which customers are having which problem.
Because we're still in the preparation stages, you'll want to make any data modifications in Recharge. After you've done so, feel free to go back to step 2 and repeat the subsequent steps until you feel comfortable with the data extraction, transformation, and validation.
Migration Day
At this point, you should already have your program with Ordergroove live.
Now that we've done some practice runs, we should be ready for the real migration. This requires the following:
- Configuring Stripe in Shopify
- Downloading and validating the data
- Setting up the test customer file
- Importing the test customer/subscription
- Placing a test order
- Validating payment processing
- Importing the full data set
- Resolving any errors
1. Configuring Stripe in Shopify
Takes about 5 minutes to complete
Please refer to our Knowledge Center article on how to connect your Stripe account from Recharge to your Shopify store.
2. Downloading and validating the data
Takes 5 minutes to 1 hour to complete depending on data size
Please refer to step 2, Transforming the Recharge data for use in Ordergroove in the Test Migration section above for details about how to download and validate your Recharge data using our tools.
3. Setting up the test customer file
Takes about 10 minutes
In the "success" file, you'll need to locate the test customer
- Open the success file
- Do a search for the email address of the test customer
- Cut the entire contents of the row corresponding to the test customer
- Open a new file
- Paste the data of the test customer into a new file
- Make sure you don't leave a blank line in the success file
You'll want to give the file containing the test customer a representative name, for example: test_customer_for_og_migration.json
If the test customer is in the error file, you can extract it just the same as above, but because there were errors, you'll need to make some modifications to the data.
4. Importing the test customer/subscription
Takes about 10 minutes to complete
- Click on the Migration tab on the Migrations page in Ordergroove. If you do not see the Shopify logo and the message "This migration will include Shopify contracts" the payment processing test will fail later. Please open a ticket with us before moving forward.
- Use the "Upload" button to select the test customer file we created in the previous step.
WarningBe extra careful and make sure you pick the correct file. If you feel you accidentally uploaded the wrong file (aka - the full data set), please reach out to us immediately so we can get in front of halting the process sooner rather than later. There is currently no way for you to stop this process once it begins.
- A new row will be added to the table and you'll see that the file you provided will be listed as "In Progress…"

When the process is over, download all three file types. If everything worked correctly, both the "Errors" and "Unprocessed" files should be empty and the "Successful" file should contain your test customer. If that's the case please move on to the Placing a test order section below. Otherwise, please keep reading.
TEST CUSTOMER IMPORT ERROR
Sometimes, even after all the preparation, the test customer can still result in an error. While we do our best to give you detailed errors so you can feel confident in the changes you need to make for a successful import, some errors require a little bit more explanation.
- "Shopify store is not configured with a payment gateway that allows customers to purchase subscriptions."
If you see this error it means that your store has not met Shopify's "subscription eligibility requirements." Feel free to reach out to us and we'll do our best to assist you any way we can. You can then repeat importing the test customer once you feel this has been resolved. - "Shopify store has not connected Stripe as a secondary payment gateway."
If you see this error, it means there's no Stripe account connected to your Shopify store. You'll need to follow thek steps Shopify recommends in order to connect your Stripe account. We also recommend checking out our Knowledge Center article on troubleshooting connecting Stripe to Shopify. You can then repeat importing the test customer once you feel this has been resolved.
For any other errors, please feel free to remediate as you see fit and retry importing the test customer
- Modify the error file
- Save your modifications
- Go back to the start of step 4, Importing the test customer/subscription
- Be very careful to make sure you pick the correct file.
5. Placing a test order
Takes about 15 to 20 minutes to complete
Now that the test customer has been successfully imported, the most import question can be answered: Can a customer be charged when an order is placed?
To test this, you'll use some of Ordergroove's tools to facilitate and verify this.
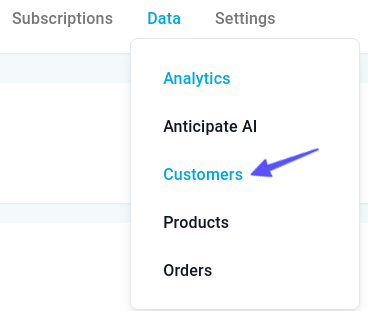
- Navigate to the customer search screen by selecting the "Customers" link under the "Data" section of the navbar
- Search for the test customer's email address
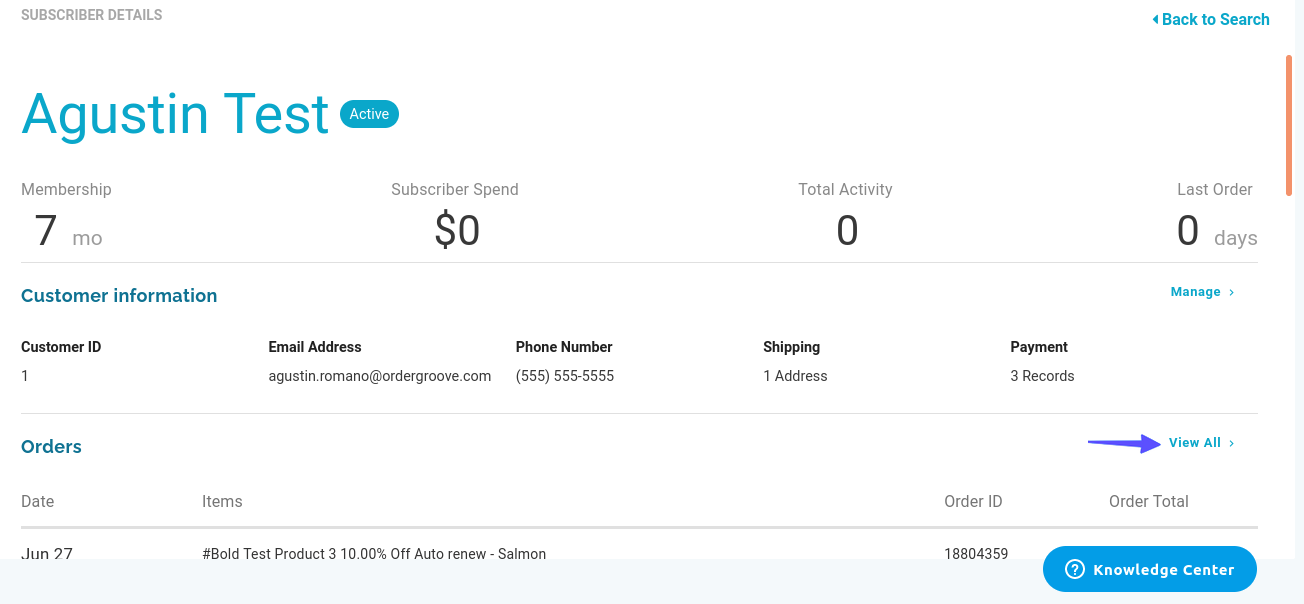
- Click on the customer row to be brought to a more detailed view. You should take a moment to verify that all the test customer information is as you expected
- Click "View All" on the left side of the Orders section in this view
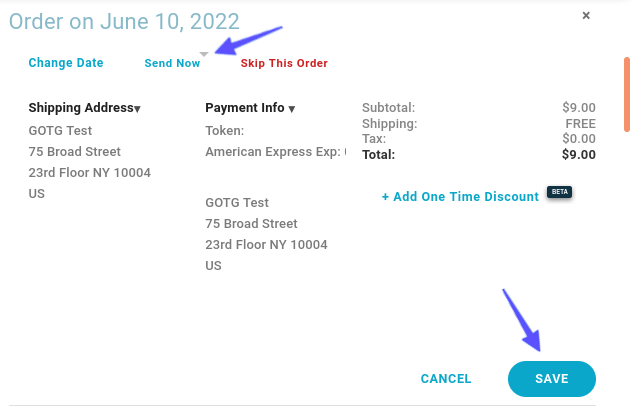
- Click on the upcoming order of the test customer so it expands
- Click the "Send Now" button on the top left
- Click "Save"
At this point, we'll want to wait for the Order Placement system to run. It will fetch the order and attempt to push it into your Ecomm system. Feel free to occasionally reload the page.
After a little bit, you should see the order update. If you see it was in a "Success" state, move on to the next step, Validating payment processing. Otherwise, here are some notes to consider with respect to failed order placement.
If you see a Placement Failure
- To find out why an order was not successfully placed, checkout our order placement section under the Data section of the navbar

- In the "Filter" section, set the search filter to "Email"
- In the "Value" section, provide the test customer email address.
You should see two rows, click on the "Response" button to gain insight as to why the order was rejected.
If the system had a timeout communicating with your Ecomm system, that's OK. We'll retry that again.
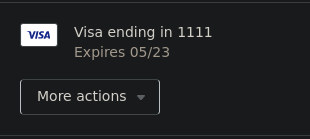
If it's payment related, you should look for the test customer in your Shopify store. In Shopify's customer view, if their payment was successfully migrated, the customer information will typically display information with respect to name on card, last 4 digits, etc. You should see something like the following on the right hand side of the customer view.
If not, there's a good chance something might be wrong with how Stripe is configured with the Shopify store. If this is the case, please check out our article on troubleshooting connecting Stripe to Shopify.
This however requires some help from us. We'll need to move the test customer "out of the way" so to speak. The main reason: if you have a payment issue in Shopify, but the data got into Ordergroove, you'll need to start the import process from the beginning. However, all the data already exists and we have many checks that ensure we don't double import any data. We can help make it so that you can re-import the test customer.
It's worth nothing, this situation is exactly why the test customer is so valuable: it's much easier to resolve one single customer than an entire program.
Worst case scenario, don't hesitate to open a ticket with us.
6. Validating payment processing
Takes about 5 to 10 minutes to complete
With Shopify reporting the order as being successful and that being reflected in Ordergroove, we can now verify that the card was indeed charged successfully. Please refer to Shopify's guide on how orders are processed.
- Search for the test customer's email in Shopify admin's customer section:
https://{{YOUR-SHOP-DOMAIN}}.myshopify.com/admin/customers - Confirm that Shopify was able to capture payment.
- It should be enough if Shopify reflects this, but it may also be worth it to wait for the charge to appear on the test customer's credit card.
- If you don't see the payment captured for that order within a reasonable amount of time, you may need to review your Stripe integration. We also recommended that you open a ticket with us at this point.
7. Importing the full data set
Takes 10 minutes to more than 1 hour to complete, depending on data size
- Click on the Migration tab on the Migrations page in Ordergroove. If you do not see the Shopify logo and the message "This migration will include Shopify contracts" the payment processing test will fail later. Please open a ticket with us before moving forward.
- Once again, click on the Upload button and select the Successful file downloaded from the step 2, Downloading and validating the data
- A new row will appear in the table below indicating that the import process has begun.
- Periodically check back on this page. We're waiting for the Processing Status column to move from "In Progress…" to "Completed" at which point you can download Unprocessed, Errors, and Successful files.
If you've followed all of our steps, you should have been able to successfully import a good amount if not all of your data into the Ordergroove platform.
8. Resolving any errors
Takes 10 minutes to more than 1 hour to complete, depending on data size
Now comes the trickiest part of the migration process: error remediation. Because it's migration day, any changes you make to remediate errors will have to be done directly in the Errors file.
NoteYou should always re-run the previous run's error file.
- Each row represents all the data of a customer
- If ANY data for the customer has an error, they will appear in this file
Let's give extra attention to the last bullet: if a customer has multiple subscriptions and only one has an error, all of the good data will be imported. The error file includes all of this data as well as the error data. Take great care when modifying these files.
- Errors in Test Run tab
If you have an Errors file in the "Test Run" tab, it is recommended to make updates to that file and then execute the "Test Run" tab again. This may produce another Errors file, but any data in the Successful file should be good to go in the "Migration" tab. - Errors in the Migration tab
If you have an Errors file from the "Migration" tab, you'll need to modify this file and retry importing it.
Here are some resources that we think should be helpful to get you going:
- Check out this article to familiarize yourself with how the data and errors in these files are structured.
- Check out this article to better understand the types of errors you might encounter in the error file.
If you're feeling more adventurous, we have a script/utility you can use to parse the error file and provide more of a summarized view of the file. It takes the file and focuses on the errors, showing the errors that manifested for each specific customer.
It's up to you which one you prefer to tackle first and how much time you want to dedicate.
For your own peace of mind, we take many precautions to ensure the migration is an idempotent process, but you can help! Think of re-running errors like a relay race: the previous error file passes the baton to the next runner and so on and so forth until there are hopefully no errors left.
Updated 6 months ago